
Wednesday, July 30, 2014
Missing Pictures
When I logged on today, I found that all of my pictures had disappeared. I have redone the pictures in most of my posts. I couldn't find my pictures for a couple of posts so they are no longer available. If I find the photos, I will add them. I'm not sure why the photos decided to do a vanishing act, but I realize that I am not the only one.

Tuesday, June 10, 2014
AER Conference Presentation
In April, I presented a workshop at the AER Conference in Virginia. I am sharing some of the slides from my part of the presentation.

Many of my students have Cortical Visual Impairment (CVI). I love the blank books from www.barebooks.com. The shiny red paper comes on a roll from the Dollar Tree. I got 11 - 12 pages from each roll. I used double sided adhesive paper on the back.


Story bags are available from APH. I like to use them to keep a student's Dots for Tots materials from the Braille Institute. You can also use them to keep together a student's objects for a calendar or a favorite book.

Feel and Peel Carousel of Textures has to be one of my favorite products from APH. This picture is a binder that I created so that students with CVI had their favorite background when making choices.

The Carousel of Textures makes a nice addition to the Rolling Right Along Construction Kit. I also enjoy letting students use textured cutout to make repeated line books.

They Symbols and Meaning Kit is a newer product from APH. I like using the plastic pages to make books for students.

Using the iPad with Students with Visual Impairments
This has been a very busy year. I have been working with a student who needs to learn finger isolation skills and using a light touch. I went to the Virginia AER Conference this year in April. I went to a session on using overlays with the iPad. The session talked about using the overlays with reading and writing programs. I came up with the idea to use an overlay to encourage my student to use a light touch and practice finger isolation skills.
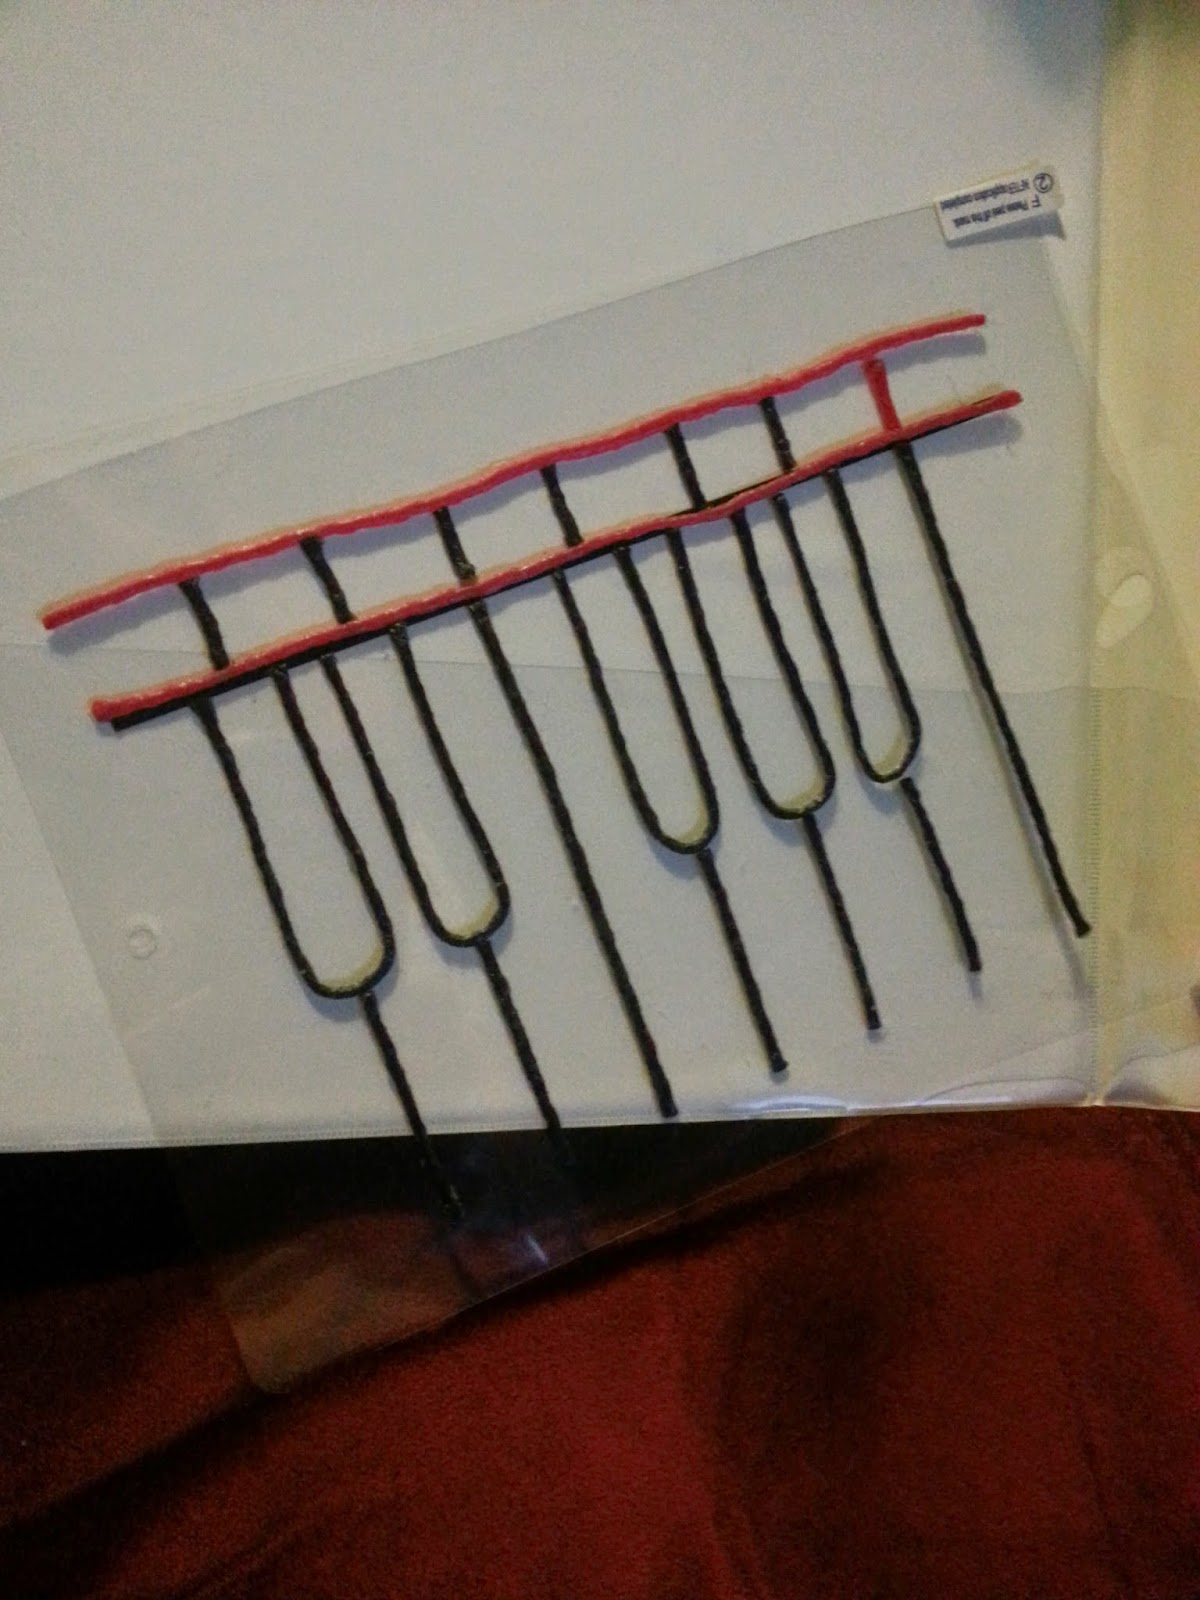
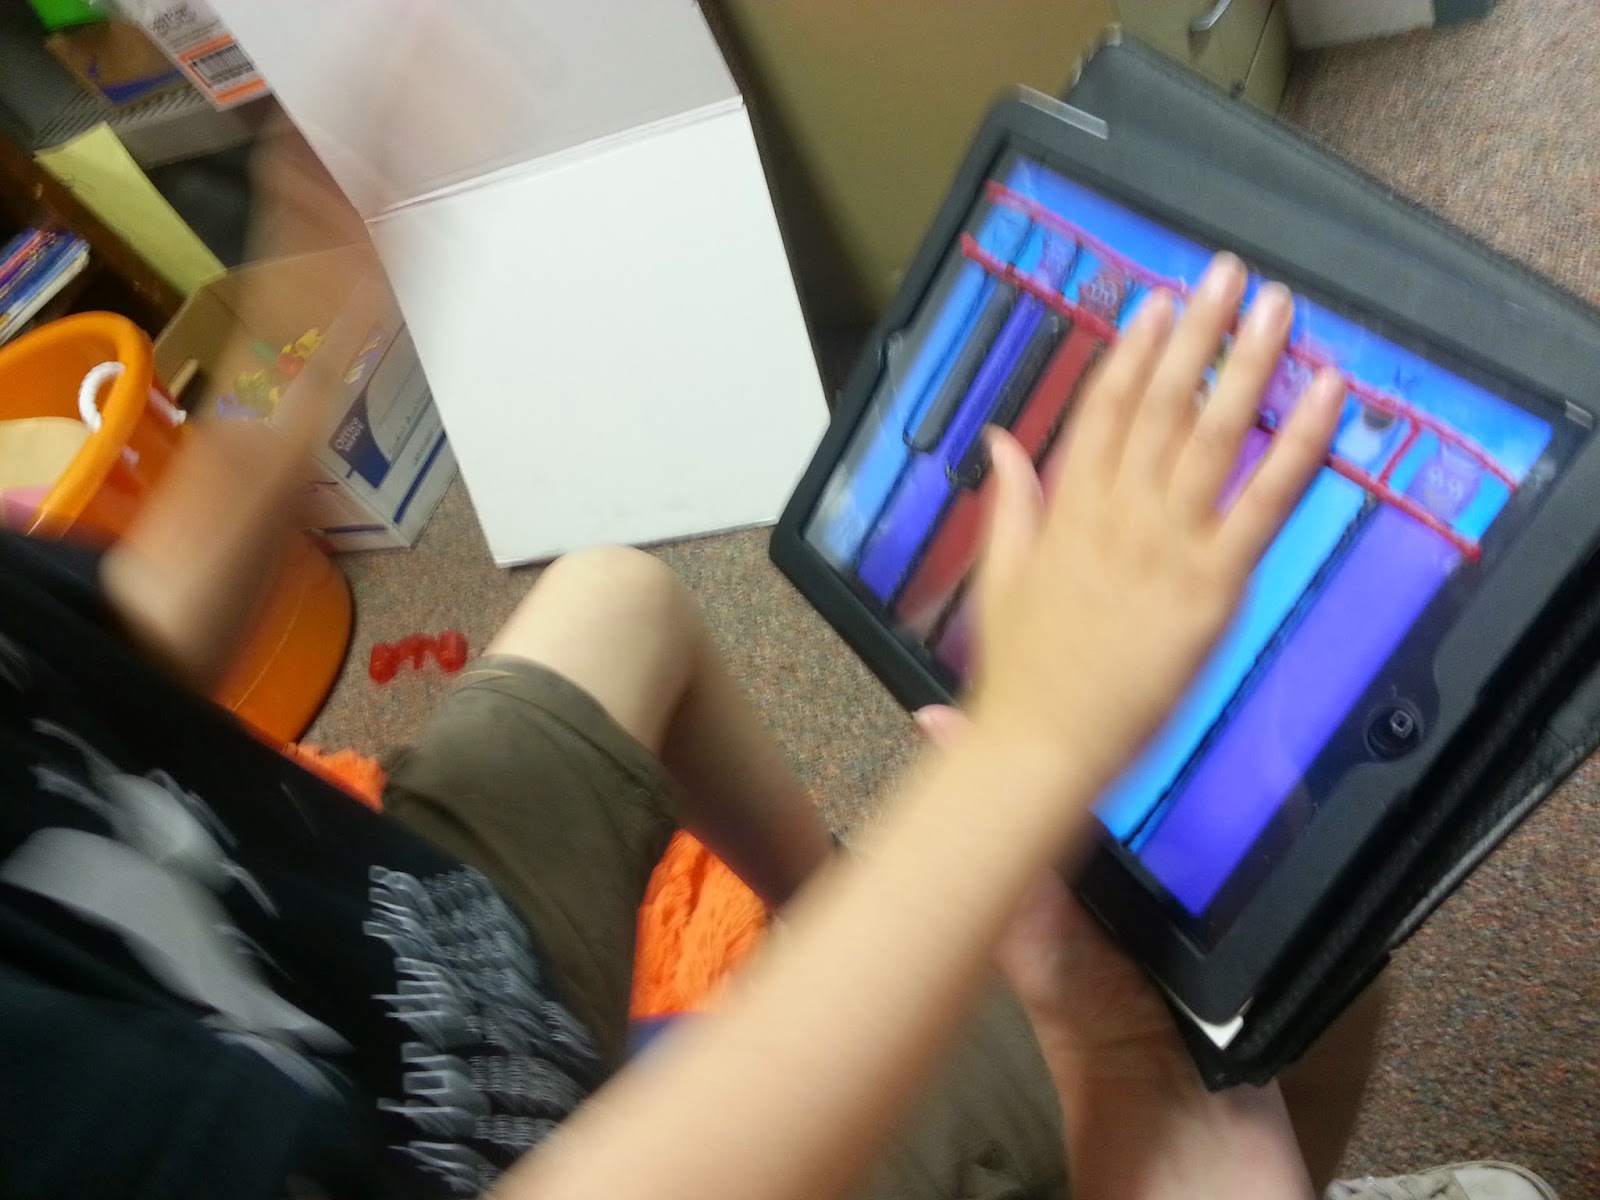
My student enjoys music so I pulled up a piano app and designed an overlay. I purchased the protective cover at the Dollar Tree. I left the cover intact and used Wiki Sticks to create the design. You could use puffy paint or hot glue. I wouldn't suggest using the hot glue while the overlay is on the iPad.

I use my personal iPad with my students. It has the a cover with a magnetic keyboard. I slid the overlay between the case and the iPad. Store the overlays in a binder using page protectors.

My student enjoys music so I pulled up a piano app and designed an overlay. I purchased the protective cover at the Dollar Tree. I left the cover intact and used Wiki Sticks to create the design. You could use puffy paint or hot glue. I wouldn't suggest using the hot glue while the overlay is on the iPad.
I use my personal iPad with my students. It has the a cover with a magnetic keyboard. I slid the overlay between the case and the iPad. Store the overlays in a binder using page protectors.
I look forward to making a few more to use with my students.
Wednesday, May 22, 2013
Spaghetti Textured Painting
One of the classes I work with was learning about Italy. I combined spaghetti and the Italian flag. Here is what we did.
Directions:
Cook the spaghetti the night before. Add a little oil to keep it from sticking. Refrigerate overnight. I read The Longest Noodle before doing the activity. Have the kids put a handful of spaghetti into two baggies (2 handfuls total). Add one color of paint per bag. Shake the bag to mix the paint and pasta. Add more paint if necessary. Put an 11 by 17 piece of heavy paper into the bottom of paper box top. Shake the box top or use utensils to move the spaghetti around. Dump the excess spaghetti into the trash. Some may stay attached but that is okay. It adds texture to the finished product. You could also add glitter to the paint. Glow in the dark paint might be fun too.


Wax Paper Stained Glass for the Light Box
I have a few students who benefit from light box activities. This activity can be created on the light box. After it dries, it can be used with the light box.


Directions:
Draw a simple shape onto a piece of wax paper with a black permanent marker. If the student can rip tissue paper, have him rip the paper into small pieces. You can do this in advance and cut the paper into small squares. Spread enough glue to cover the shape. Place the tissue paper pieces onto the shape. It doesn't matter if you go over the edges because the shape will be cut out with scissors. When the shape is completely covered with a single layer, cover the paper with glue. I used thin lines because when you press the project together, the glue will spread. Place another piece of wax paper on top of the glue. Smooth the paper. Allow the project to dry over night. Cut out the project.
Here is a picture of the butterfly that I did with one group. I also made an earth. The outlines can be changed to match the curriculum. (pyramid-Egypt, shapes-math, etc.)
Background Binder
Many students benefit from different backgrounds when presenting choices. I created this binder for a specials teacher that works with many students. She uses the shiny backgrounds when working with students who only visually attend to shiny things. I included a black background and a few others. I added the Velcro dots to the outside of the binder so that the backgrounds can easily slide into the binder.


Thursday, April 25, 2013
Patriotic Art

Preparation for the activity (This can be done with the students if you have enough time):
Use painters tape to make random lines on the canvas or poster board. (Canvas works better than poster board when you remove the tape and stickers)
Add some star shaped stickers. ( I made the stickers a little less sticky by sticking them to a fuzzy piece of material first.)
Activity:
My students used sponge brushes to paint on the red and blue paint. Their job was to completely cover the white. I added glitter to the paint for a little sparkle.
After the activity:
Let the paint dry completely, then carefully remove the tape and the stickers.
Tuesday, February 19, 2013
Sensory Sundial
 I work with a group of students who are studying Ancient Rome. The Ancient Romans told time using a sundial or a water clock. I chose to adapt the sundial.
 Materials:
Air-dry clay
small paper plates
small rocks
gold glitter (of course)
small craft sticks
glue
Directions:
Push the clay to the edges of the plate. It does not need to be really thick. Make a lump in the middle for the stick. Sprinkle gold glitter on the clay. Push the glitter into the clay. Push small rocks around the edges of the clay. Use glue to add glitter to the craft stick. Push craft stick in at an angle. Once the clay dries (at least overnight), tear away the paper plate.
After we finished the sundials, I turned off the lights and used a flashlight to demonstrate how the sundial was used to tell time. Our sundials were not accurate.
Sensory Valentine
 Valentine's day is a great day for a messy sensory project. My students made Valentines. I started with a white heart and coated it with glue. The students added fake rose petals, tinsel, textured shapes, and glittery foam hearts. We glued the hearts to a piece of poster board.
 Most of the materials were purchased at the Dollar Tree. I would suggest cutting the tinsel into shorter pieces. It was really long.
Cardinal Sensory Activity

I found my feathers after Christmas at Michael's. The bag came with red, green, and white feathers. All I had to do was separate them.
When I was cleaning out my basement, I found an old box of tractor feed paper. I ripped off a few pages and ran it through my shredder while I got ready for work. It was a lot faster than shredding one sheet at a time.
Thursday, December 13, 2012
Sensory Trees

Sprinkling methods 1. Place the paper on your hand and have the student knock it onto the tree. 2. Have the student pinch the paper and sprinkle. 3. Use an extra large spice container with a big opening.
If you have a student who is blind, you may want to mark the lines with hot glue. This will help if the student uses her finger to spread the glue inside the lines.
Sunday, October 21, 2012
October 2012 Activities

This month I focused on attributes. I read a book called The Littlest Pumpkin which focused on big and little. I created some pumpkin eggs to demonstrate heavy and light. I filled half of the plastic eggs with fish gravel. After I drew on the faces, I used clear packing tape to keep the eggs from coming open.
The eggs could be used for a sorting activity for some students. My students dropped the eggs into a metal bowl and listened to the different sounds.
I used the ball with an elastic strap with my students with Cortical Visual Impairment. I added the face to the bright orange ball.
Friday, May 11, 2012
Butterflies

We also made a butterfly from a coffee filter. Some of my students painted their butterfly on the Mini-Lite Box from APH. I used shiny pipe cleaners to make the antennae, and bright colored clothes pins for the body. We used watercolor paints and brushes. Try not to let the filter get too wet, or wait until it dries to add the antennae. Wrap the pipe cleaner around the body, then twist. I used plastic clothes pins, but you could use the wooden pins and paint them.
If you have a student with low vision or CVI (Cortical Visual Impairment), shiny pipe cleaners can be a quick way to highlight pictures or objects.
Sunday, April 29, 2012
That’s Not My Bear
I read the book That's Not My Bear available from APH. After we finished reading the book, my student made her own book. I showed her four bears made of different textures. She chose the one she liked and that became "her" bear. We placed this bear on the page that said "That's my bear," then she chose which bear she wanted to put on the cover and the other pages of her book.

ECC Open House

We decided to base our display on the book Rosie's Walk. We developed sensory activities that could be used with the book. We matched the activities to the pages in the book.

 The pond was a silver bowl of water with light up ducks. The larger ducks were found at the dollar store.
The fence was created with a cardboard box surrounded by a sheet of brown poster board. We placed a tactile matching activity behind the fence.


Sensory activities can be used with many children's books.
March Ideas

Wednesday, February 22, 2012
Tactile Discrimination

I saw an activity like this on Pinterest, but I couldn’t find it again. I have learned to pin or like anything I want to see again. Pinterest is a great place to find ideas and save them with a picture to remember what you have saved. It is a visual list of your "favorites." Each picture is a link to the web page where you found the activity, idea, or picture.
One of the pre-braille skills students need to learn is to discriminate items or textures by touch.
We have an abundance of long file folders in our office, so my goal was to make use of them. I used the embosser to create dot hands and placed them on the folder. I used also used 6 different textured papers/sheets. I placed one of each texture under the hand, then used a Velcro dot in the middle of the hand. The Velcro on the back of the textured squares is larger to make it easier to stick it to the piece on the hand. The object of the activity is to explore the texture under each hand and place its match in the hand.
Thursday, January 26, 2012
Weather


Pin It


I used the Rolling Right Along Construction Kit to create a book for a preschool student. The weather pictures are created using textured papers. Each type of weather has a different texture and shape. The student rolls the ball along the velcro path. The words of the class weather songs are included so the student can read or sing the words as he moves the ball across the pages.

Thursday, January 19, 2012
Textured Snowmen

Pin It
I love snow and especially snow days, so this month some of my activities have centered around snowmen. I created this activity for my students who are blind or have low vision.

We read a "touchy feely" Usborne book called That's Not My Snowman. The students explored the different textures in the book before making their own snowman.
The students made their color selections, and stuck the items to the paper. The students had to pinch and pull the cotton balls and glue onto the snowman. The students used markers to draw a mouth and color the bumpy eyes. The activity was great for exploring some of the attributes that are tested on the Virginia Alternative Assessment (VAAP).

Monday, October 31, 2011
Rolling Right Along Construction Kit from APH


The last two pages contain a variety of shapes and textures that can be removed and explored.
Subscribe to:
Posts (Atom)